Ok, I’ll admit it. In years past, I’ve been a decorate-for-Christmas-on-December-23 type of girl. The holidays just always seem to sneak up on me. But this year, having finally moved into our fixer-upper and having a 20-month-old on my hands, everything is different. Now I have a lot more incentive to make our house feel special, cozy and inviting. I really want the season to be extra merry and bright for my kiddo – but I’m embracing the spirit too. After everything 2016 has put us through, I’m very ready to revel in the ultimate yuletide feeling. You with me?

As in years past, I turned to the guru, one Ms. Martha Stewart, to help with my holiday decorating. This year, I decided to turn our entryway into a Christmas-y wonderland. Spoiler alert – this is also a major sneak peek of our house!

apt34-martha-8458

A dramatic entryway deserves some dramatic holiday decor, but achieving the look doesn’t have to be complicated. I used just a few key pieces to create the simple, sophisticated vibe I was going for; a garland, a wreath and a little mini tree.

To make it easy on myself, I had Ms. Martha help me out with a beautiful faux garland as well as a faux wreath from her Martha Stewart for the Home Depot collection. Going faux makes life so much easier. There’s no needles scattering everywhere and no worry about the entire thing turning brown and brittle. You’re guaranteed to have good looking greens until they go back into their boxes, ready for the next year.

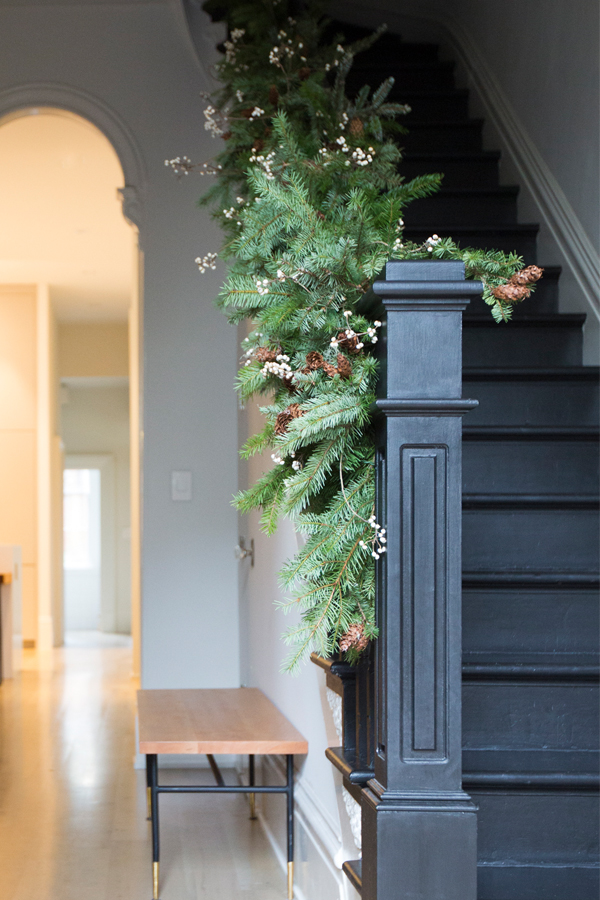
But going faux doesn’t mean you can’t get creative. In fact, it just gives you a great base to work with – no extensive DIY skills required. To make my garland and wreath a bit more personal, I decided I wanted to add my own elements. Some additional fresh pine boughs scattered throughout the garland, along with sprigs of white berries helped to fill out the gaps and really amp up the unique factor. I love how the garland cascades down the newel post on the stairway. It adds a touch of extra drama.

apt34-martha-8396apt34holidaydecor2

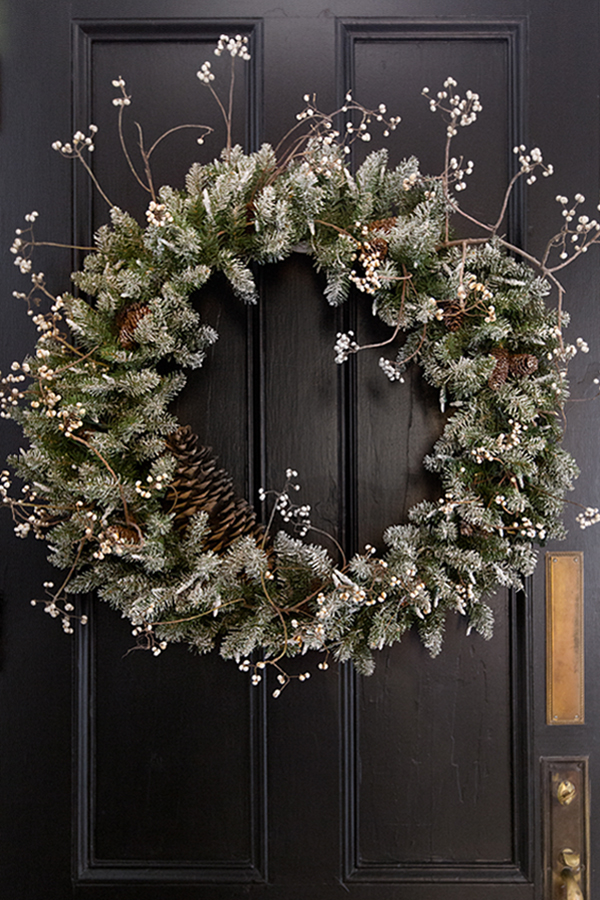
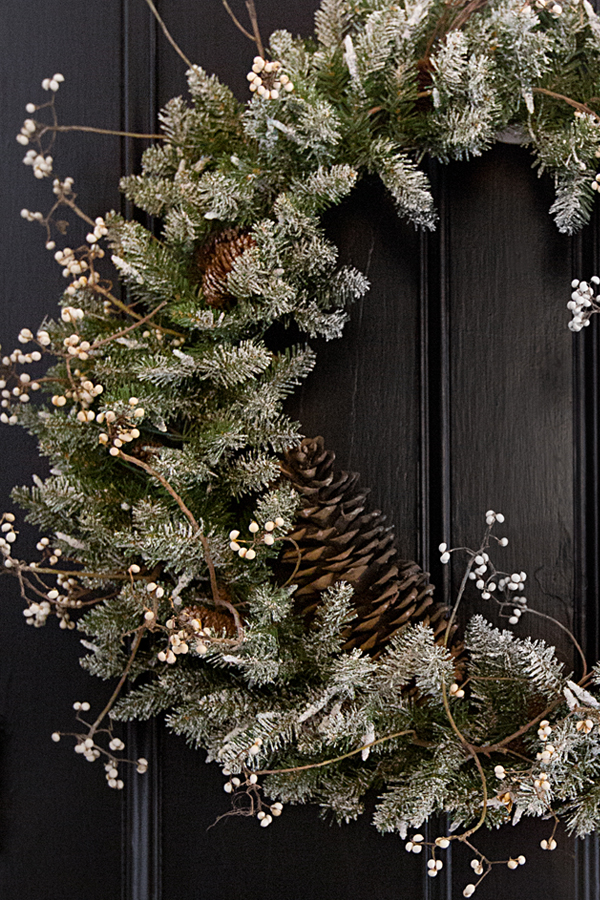
Adding berry sprigs to the wreath (which already came frosted and adorned with its own pine cones), pulls the entire look together. Tszujing a store-bought garland or wreath doesn’t require a set plan nor any over thinking of the design. Simply stick in branches here and there until you start to get the look you’re going for. I intentionally added weight to one side of the wreath to make it a little more asymmetrical along with a jumob-sized pinecone as a final flourish.

apt34_holidaydecor5apt34holidaydecor3

A little potted pine tucked into our hallway corner adds some additional personality to the entryway – and it was just so cute I couldn’t resist him.

And there you have it. Just a few easy steps and my house feels celebratory the moment you set foot through the door. My kiddo really loves it. And I really really love that.


original photography for apartment 34 by michelle drewes / florals by lambert floral studio

This post in partnership with Martha Stewart for the Home Depot. All thoughts and opinions are my own. Thanks for supporting posts that have kept apt34’s doors open.

If Valentine’s Day has snuck up on you this year, no worries! You can still whip up a beautiful brunch spread for your lov-ah or your bestie (did you know Galentine’s Day is a thing?? I’m just finding out myself). Anywho, we’ve put together a kick ass brunch spread that will make anyone feel loved. There’s even a quick Valentine’s Day DIY to make you look like that domestic goddess that, come on, we’ll probably never actually be! This DIY is so good, I dare you to spot it in the pics below.

Apartment 34 Chambord brunchChambord brunch 7Chambord brunch 5apartment 34 brunch Chambord brunch 11Chambord brunch 14

MARBLE COASTER DIY by Craft & Cockatils 

Materials
Black ceramic tile
white paint
gray paint
feather
paint brush
sandpaper
clear acrylic sealer spray
felt
hot glue

Directions
Step 1: Lightly sand ceramic tiles. Wipe with damp cloth.

Step 2: Dip a feather in white paint. Using the tip, paint random lines on the tile, pressing harder in some spots to vary lines. Marble lines go in the same general direction, but are random so keep this in mind when painting (we pulled up an image of marble to refer to.)

Step 3: Using a thin paint brush, go over some lines with white and light gray paint to define and differentiate lines. Let dry.

Step 4: Spray with clear acrylic sealer and allow to set.

Step 5: Finally, cut felt into squares to fit the size of the coaster and glue to the bottom of the tile.

Chambord brunch 15Chambord brunch 16Chambord brunch 17

No matter your feelings about candy hearts and sappy sentiments, there’s no reason to pass up an excuse to get fancy. So grab a bottle of Chambord and tap into your creative side. Even if your better half doesn’t appreciate the gesture, you’ll have a ball sipping on your hot pink drink! Check out the recipes for our Valentine’s Day cocktails below – though they’re so good they don’t need to be reserved for a special occasion. I think any old Tuesday would be the perfect time to enjoy one.

Chambord brunch 13

RECIPE: DIAMOND IN THE ROUGE 

Ingredients

1 3/4 oz bourbon
3/4 oz Chambord
3/4 oz blood orange juice
1/8 tsp Balsamic vinegar
Blood orange slice

Directions
Add all ingredients into a shaker with ice. Strain into a glass with one large ice cube. Garnish with blood orange slice.

Chambord brunch 8

RECIPE: NOIR FRAMBOISE FIZZ

Ingredients

2 oz champagne
1 oz gin
1 oz Chambord
1/4 oz lime juice
1/4 oz simple syrup
a quarter of a vanilla bean

Directions
Cut the vanilla bean in half and scrap the seeds out and add to a shaker. Add all the other ingredients but the champagne into the shaker with ice. Double strain into a champagne flute. Top with the champagne and garnish with raspberry & blackberry.


art direction by erin hiemstra // photography, production & original cocktail recipes for apartment 34 by craft & cocktails 

This post is in partnership with Chambord and Refinery 29. All thoughts and opinions are 100% our own. Please drink responsibly. Thanks for supporting awesome partnerships that have kept apartment 34’s doors open all these years. Like seriously. I really appreciate it. Brown-Forman Corporation, Louisville, KY, Black Raspberry Liqueur; 16.5%, 21+.

There are 18 sleeps until Christmas. Have you decorated yet?? I’ve had a hard time figuring out how to deck our halls with a crawling 8-month old puttering around. Our oversized Christmas tree doesn’t really seem practical. It would eat up half of Carter’s crawling space. And since he’s discovered a love of cords I’m not really willing to add even more electrical hazards to the mix. So I’m considering an alternative this year – a modern update on the Christmas wreath with an easy wreath DIY.

Wall-mounted Christmas decor isn’t new. We actually shared an adorable Christmas Tree DIY last year, but I’m in the mood for something a little different. A little modern. I’ve been seeing a lot of different wreath options pop up all over Pinterest, but I’m loving this asymmetrical version. Its simplicity gives it a cool, chic feel, but the use of olive branches lend a rustic touch.

medium_ED_v1.66_ATHENA_PUTNUM_wreath

The steps to create something like this are actually pretty simple.

STEP ONE: Cut standard 18-inch wire wreath frame in half, creating a crescent shape

STEP TWO: Gather small bunches of olive branches and overlay them down the wreath frame, securing them with wire. Move along the wreath frame with the branches all going in the same direction.

STEP THREE: Reverse the direction of your olive branch bundles for the last third of the wreath frame that you have left

STEP FOUR: Take a piece of silky ribbon and tie a bow around the empty spot where your branch stems meet.

STEP FIVE: Tie a long piece of twine to each end of the wreath frame for hanging.

I think this is one project I can actually pull off before Christmas Eve rolls around! For more innovative decorating ideas CLICK HERE.

wreath by putnam & putnam for the line

I won’t lie, it’s been quite a while since Halloween has been top of mind. It’s just never been one of my favorite holidays.  But now that Carter’s first Halloween is around the corner, I’m feeling compelled to get in the spirit – quickly!

But I definitely want to stay true to my aesthetic so the standard jack-o-lantern just won’t do the trick. This no-carve pumpkin DIY, on the other hand, is super chic. And since it takes less than five minutes to make, it fits perfectly into my overly-packed schedule.

LAST-SECOND PUMPKIN DIY THAT’S SCARY GOOD on apartment 34

Around here, no orange gourds will do. They just don’t mesh with my color palette people! With this look it’s all about the muted hues: white, gray and various shades of pale green. The funkier the better.

Then all you need is a box of crayons, a hair dryer and five minutes to complete the look! Now that I can handle.

LAST-SECOND PUMPKIN DIY THAT’S SCARY GOOD on apartment 34 LAST-SECOND PUMPKIN DIY THAT’S SCARY GOOD on apartment 34

The final result is a little bit spooky, a little bit artistic and a lot cool. This is taking modern pumpkins to a whole other level don’t you think?

Are you the Halloween loving type? Whether you’ve already had your costume figured out for months or you’re scrambling for inspiration {like me}, I know you’ll appreciate this tabletop, this drink, these costumes for the adults and these costumes for the littles.

Happy haunting friends!

photography by megan bailey 

There’s something to be said about a good old fashioned inspiration board. These days the majority of our messy, random, unfiltered tidbits of inspiration exist only in digital format. Despite Pinterest being a game-changer when it comes to bookmarking ideas {along with our poor, overworked and abused computer desktops!}, sometimes we find ourselves nostalgic for the tangibility and rawness of a physical mood board. That’s why when we saw this beautiful pegboard of earthy artifacts, we had to pin it {so very meta of us, right!?}.

idea-to-steal-peg-board

Pegboard makes for such unique idea boards because they encourage the display of physical artifacts {take THAT Pinterest!}. We love the 3D look of varying textures, shapes and forms {like plants!} clustered together to create an organic and no-fuss feel. Not to mention, the texture of the board itself {hello, perforation!} creates visual interest on an otherwise empty wall. We see a DIY coming on…

What do you think? Do you LOVE?

image via Still Stars // photography by Heidi Lerkenfeldt

So one of your best friends in the whole wide world is getting married and she asked you to be one of her bridesmaids, or even more special, the maid of honor — eek! But before you help calm her nerves, pick up her train or dab away joyful tears on what’s sure to be the most memorable day of her life, you have one job and one job only: throw an epic bachlorette party! Cocktails, pool lounging and much needed girl time are the requisite requirements, but before you jet to a wild weekend in Palm Springs, Vegas or Miami Beach, there are three words you must remember to ensure your epic weekend goes as planned: Bridesmaid Survival Kits!

bridesmaid-eoseos-apt-34-4

That’s right. Starting the trip off on the right foot is so key in making sure the bridal party {and the bride!} have the time of their l-i-f-e. And what cuter way to do it then by leaving a goodie box at each maid’s house, packed full of everything they’ll need to make the most of an ultimate bachlorette weekend?? Because someone is bound to forget their sunscreen at home {or maybe enjoy one margarita too many!}.

These survival kits are so much fun {and super simple!} to make. So on a nice afternoon, invite your craftiest friend over for cheese and wine and the two of you can sit on the floor while gabbing through wedding details and assembling these cute kits. With a heartfelt card from the bride and a few essentials, the ladies will flip. You can personalize your kits however you’d like, but here’s what we packed in ours:

eos-apt-34-2eos-apt-34-3

Pre-boarding, the girls will need a great read so pack your favorite magazine {this is currently one of our must-reads}, a sunglasses case to protect their shades and cute matching bridal party luggage tags will make sure no one loses their bag!

Assuming everyone plans to go straight to the pool from the plane, sea salt spray will help master that perfect beach hair {we swear by this one}, good sunscreen is a must and some shaving cream {we love the EOS shave cream with shea butter!} will help with any ahem…last second touchups. Lounging essentials include cute deck sandals, hot sunnies and some paper umbrellas, JUST in case your hotel misses the “we’re here to have a good time!” memo!

What else is in our kits? For pre-night-out prep, these beautiful bath salts from Anthropologie will certainly spoil all your gals, nail polish for hotel room manis-pedis and luxurious Aesop face mask will ensure everyone is looking their best. And you can’t forget the Advil, Emergen-C, a banana and some instant Starbucks; aka the cure for the following morning!

eos-apt-34-5eos-apt-34-10eos-apt-34-9eos-apt-34-6

Of course, it’s not only what’s inside the kit that matters, but also how you deliver it! Wrap them up with pretty paper {and a party hat to boot!} and leave one on each maid’s doorstep. It’ll be such a cute surprise for them to come home to, don’t you think? All that will be left for your maids to do is to let their hair down, sip way too many umbrella topped cocktails and celebrate the bride-to-be while looking and feeling good!

original photography for apartment 34 by aubrie pick // art direction + styling by bianca sotelo

If you’re like us, you’re on a mission to clean, organize and purge everything in your house right now. There’s just something about starting a new year with a clean slate that invigorates you for the exciting 360 somethin’ days ahead. But it’s not always easy. In fact, it can be a lot of work. So if you don’t want to dedicate every waking hour or free weekend to dusting, sorting and arranging, here are three super easy DIY’s that’ll organize some of your most cluttered spaces and give you a little design-high in no time!

jewelry-ogranization-diy

They say if you can’t see what you have, you never wear it. That’s why we’re loving this idea – a DIY that’ll help us tame the hot mess on top of the dresser that is our jewelry. Piles of baubles and tangled necklaces, rings and bracelets are finally organized by something cute and NOT acrylic. Say whaaa?! This Brass and Wood Jewelry Block DIY is the perfect pep we needed to purge those old pieces we never wear anyway!

wire-pot-rack-diy

No noise on a Saturday morning is worse than the clanking of pots and pans being rummaged through in a never ending pile of stainless steel. Cut the clammer with this DIY Wire Pot Rack. Not only does it help you organize your pots and pans, it also is an easy way to have your most used kitchen tools right at your finger tips! Now that pancake making can be smooth and silent sailing!

bathroom-organization-diy

Ok, it’s time to go through your makeup brushes, get ’em cleaned up and neatly put away, but it’s not time to spend a fortune at the organization store! This may technically be repurposing, but for DIY-beginners like us, it totally counts. Don’t throw away those fancy candles you burned over the holidays, instead use them to hold your makeup brushes, cotton swabs, q-tips and hair accessories! Your bathroom just got a whole lot cooler!

For more decor ideas to inspire you to spruce up your home for 2015, click HERE. Also, if you’re looking for new things to try in 2015, we’re loving these inspirations!

image 1 via Emily Henderson // 2 via A Beautiful Mess // 3 via Gingerbreadhouse

Today we have a little holiday miracle to share with you – a pretty little package tied up with a perfect bow – no tape, cuts or twisted knots required. Ok – so I didn’t say it was a big miracle but I get such joy out of these little details.

Did you know you can tie a ribbon without having to use tape? Without it having to have a bump or twits on the back? Call me crazy, but that always drives me nuts when my gifts won’t lay flat. Thankfully, there is a secret ribbon tying technique that will leave discerning gift wrappers saying, how did you do that??

how-to-tie-bow-finalhow-to-tie-ribbon-bow-steps

Step 1: Measure out your ribbon to make sure it’ll go around your box twice. Lay your cut piece of ribbon out on a flat surface

Step 2: Set your box on top of the ribbon. Make sure there’s plenty of ribbon sticking out on both ends. Make a loop on the left end {no need to tie anything, just make a little circle – the end of the ribbon will be point back toward your body}

Step 3: Slip your loop over the left corner of the box furtherest from your body. It’ll just rest there – don’t worry it might fall off – you might have to hold it in place

Step 4: The tail of your loop will stretch across the underside of the box back towards you, making a {flat!} cross

Step 5: Bring the ribbon from the right side and pull it under your corner loop

Step 6: Bring the second tail up from the underside

Step 7: Tie the two pieces in your first knot

Step 8: Tie your bow. Big, small or over-the-top huge – let your creativity be your guide!

Et voila!

bow-tying-finalapartment34_giftwrapsecret

Even if you’re the only one to appreciate the thoughtfulness that goes into your gift wrapping skills, there’s something so satisfying about tying your packages up in perfectly wrapped string!


original photography for apartment 34 by Emily Scott // custome 34 paper c/o Zazzle.com 

We don’t know about you, but for a couple of years now it seems like we’re pulling fewer and fewer of our Christmas decorations out of storage. I don’t know if it’s just the modern decor trend sinking in deeper or if it’s that the minimal lifestyle is feeling ever more appealing. Whatever the reason, the Scandinavian approach to Christmas is so attractive this year. They somehow get it just right. So with only a couple of boxes of ornaments out of storage and streamlined trimmings on our mind, we DIY’d the cutest birch branch Christmas tree you ever did see- a great alternative to the 9-footer and the perfect festive element for tight quarters! It’s so simple and super cute, even if you are decking the halls with 50 pounds of holly, you’ll want to add it to your home this season!

christmas-tree-diy-apartment-34christmas-tree-diy

We love, love, LOVE, simple moments like a sweetly sparse potted tree on the stairs or simple white paper bags wrapped in twine and hung with clothespins for an advent calendar – even live trimmings ’round a homemade candle chandelier. So cozy chic!

scandinavian-christmasscandinavian-christmas-decorscandinavian-christmas-2

Our holiday inspiration is coming straight from Copenhagen right now; craftiness meets chic simplicity. Their secret is a neutral palette: blacks, whites and soft greys, mixed in with natural elements like branches, tree trimmings and small potted evergreens, and lots of texture: think burlap, rope and twine. Mix them all togehther and your Scandi-inspired Christmas is complete!

With these inspirations as our guide, and some help from the DIY queen herself, Martha Stewart, we took to DIYing our version of a modern Scandinavian inspired Christmas tree- no water or vacuuming of pine needles required! We put a slightly more glam spin on Scandi with a mix of metallic ornaments as well as some matte white baubles {which were also a DIY!}.

christmas-tree-diy-step

Here’s how you do it yourself:

Tools:

You can find many of these items at The Home Depot here

Two 6-foot birch tree branches
Hand-Saw
Measuring Tape
Strong Baker’s Twine or Thin Rope
Martha Stewart Living Snowberry Ornaments
1 Can White Spray Paint
Gift Tags {love these and these watercolor tags!}
Pretty Baker’s Twine
Scissors {love these brass ones!}
2 ft fishing line

Method:

> Measure, mark and cut birch tree branches with saw. Bottom branch is 30 inches, then go in increments of 6 inches: 24, 18, 12, your top branch will be 6 inches.

> Lay branches out in shape of Christmas tree, longest branch on bottom, shortest on top with about 8 inches in between each branch. Wrap strong twine around bottom branch three-four times, knot it, then wrap it around next branch, knot it and cut. Repeat for all branches.

wood-christmas-tree-diy-2christmas-tree-diy-3

> Coat desired ornaments with matte white spray paint. Repeat process until fully covered.

> Cut 6 inch pieces of Butcher’s Twine and string through ornaments and tie on branches.

> Hang tree using fishing line and a 3M hook to your wall! Perfectly thin for a hallway, impactful enough for a corner in the living room and so cute for the kitchen!

> Keep a small bowl and sharpie by the tree and whenever you think of a Christmas wish, write it down on a gift tag and hang it on the tree! They could be something special to read on Christmas morning as a family. And ta-da!

wooden-christmas-tree-diy-final

The muted champagne, mocha and silver color palette of the ornaments {there are so many options to choose from here!} blends in so naturally against the textured white bark of the birch tree branches. And we’re rather smitten with our Gold Reindeer Tree Topper! This type of tree is calm and serene, yet festive and inviting – exactly what we want our holiday to be this year. This modern DIY will certainly make you rethink bringing a live tree into your tiny city apartment! It’s absolutely perfect for big and small spaces alike!

Happy Holidays!

PS: If you still just really need to go glam for Christmas don’t miss our over the top holiday decor of bold golds, rich greens & garlands for days right here.

images 1-2, 9-12 original photography for apartment 34 by Emily Scott // image 3 via Petra Bindel for Elle Decoration // 4 via // 5 via An-Magritt // 6 via // 7 via House Doctor // 8 via Frichic

This post was in partnership with Martha Stewart Living. All thoughts and opinions are our own. Thank you for supporting partnerships we’re excited about and that help keep Apartment 34’s doors open. 

Older posts
Gimme More